Tuesday, July 22, 2008

Extracting audio stream from an AVI file using mencoder

If you ever need to extract the audio stream from an XVID/MP3 encoded file and save the audio stream back into MP3 format, here's the command to do it using mencoder:
mencoder "${file}" -of rawaudio -oac mp3lame -ovc copy -o audio/"${file/%avi/mp3}"
This commands saves the output in the audio directory. The portion ${file/%avi/mp3} uses bash string replacement to replace the avi to mp3 within the ${file} variable.

MySQL: "Cannot insert new word" error

The internal forum (powered by phpBB) I was using was suddenly giving me the error "cannot insert new word". Tailing /var/log/messages and MySQL error logs came up empty. After Googling a bit, it seems that the MySQL tables are corrupt. Running the SQL command below fixes the problem beautifully:
repair table [tablename];

Monday, July 21, 2008

Kernel panic in Linux 2.6.26 on VirtualBox

I've been trying to get Intrepid Ibex Alpha 1 & 2 to boot on VirtualBox in a Linux host; but due to what it seems like a kernel bug, I've been unable to do so. If you're interested to see the development/status of this bug, click here.

HTML Cache Headers

I've always get burnt for setting the wrong HTTP headers for cache control. So here's the braindump of what these headers are and what to set them to. The RFC for HTTP header field definitions is located here.

Note that it's always better to set the headers both in the HTTP-EQUIV META tags as well as to set it via the headers as some browsers have problems parsing the HTTP-EQUIV META tags.

There are 3 HTTP headers that control browser caching behaviour. These are:
  • expires
  • pragma
  • cache-control
The "expires" directive gives the date/time after which the response is considered stale. The value 0 (zero) indicates that the response is has immediately expired while any negative value indicates that the response had already expired.

The "pragma" directive indicates that the page should not be cached. The common use is to set the directive to "pragma: no-cache".

The "cache-control" directive is a HTTP 1.1 specification. It instructs the browser how the page should be cached. Commonly set values for this directives are:
  • no-cache - tells the browser not to use a cached copy of the page
  • no-store - tells the browser never to cache the page
At the end of the day, the proper headers should be as follows:
expires: -1
cache-control: no-store

pragma: no-cache

Cache Control Settings

I've always get burnt for setting the wrong HTTP headers for cache control. So here's the braindump of what these headers are and what to set them to. The RFC for HTTP header field definitions is located here.

Note that it's always better to set the headers both in the HTTP-EQUIV META tags as well as to set it via the headers as some browsers have problems parsing the HTTP-EQUIV META tags.

There are 3 HTTP headers that control browser caching behaviour. These are:
  • expires
  • pragma
  • cache-control
The "expires" directive gives the date/time after which the response is considered stale. The value 0 (zero) indicates that the response is has immediately expired while any negative value indicates that the response had already expired.

The "pragma" directive indicates that the page should not be cached. The common use is to set the directive to "pragma: no-cache".

The "cache-control" directive is a HTTP 1.1 specification. It instructs the browser how the page should be cached. Commonly set values for this directives are:
  • no-cache - tells the browser not to use a cached copy of the page
  • no-store - tells the browser never to cache the page
At the end of the day, the proper headers should be as follows:
expires: -1
cache-control: no-store
pragma: no-cache

Sunday, July 20, 2008

Restarting NetworkManager in (K)ubuntu

If NetworkManager's acting up on your (K)ubuntu installation, you can restart 2 daemons instead of performing a reboot. Here's what you do:
sudo /etc/dbus-1/event.d/25NetworkManager restart
sudo /etc/dbus-1/event.d/26NetworkManagerDispatcher restart

Once that's done, wait for a while for the daemon to refresh itself. Then try to re-associate your machine with an AP.

Thursday, July 3, 2008

Backup fun with netcat (nc)

Was asked to help on backing up files in one server and then transfer the image to another server. Sounds simple, but unfortunately the server which files are to be backed up has very limited disk space and prevents me from creating a tar-ball.

Instead of creating a tar-ball in the server, I used netcat (or known as nc) to stream the files over to another server while running the tar command.

On the server, run the following command:
tar czvf - /opt | nc -l -p 8888 -c
This creates a tar gzipped file of the /opt directory and put the output to stdout. Pipe the output of tar to netcat (nc) which is listening (-l) to port (-p) 8888. The additional -c option is to close the connection after EOF on stdin. If this option isn't there, netcat will continue waiting for data from stdin. This is not what I want as I need the backup action to end properly in order to place it in a script.

On the receiving end, just run the following command:
nc 10.112.133.12 8888 > opt.tar.gz
This instructs netcat (nc) to connect to the IP on port 8888 and write the output to opt.tar.gz.

Well, there you have it. A quick and dirty way to transfer a backup image if you're short of space to create the backup file.

Configuring Huawei E220 USB GSM modem on Kubuntu Hardy

Managed to get my hands on a repackaged Huawei E220 USB GSM modem provided by Maxis via their Maxis Broadband package. Since there's no instructions to install and use it on Linux (Windows and OSX instructions are provided), I decided to see how Linux will behave when it's plugged into the USB port.

Lo and behold; my system's /var/log/messages when it's plugged in:
Jul 3 10:56:50 mymachine kernel: [ 3190.180769] usb 3-1: new full speed USB device using uhci_hcd and address 4
Jul 3 10:56:50 mymachine kernel: [ 3190.308736] usb 3-1: configuration #1 chosen from 1 choice
Jul 3 10:56:50 mymachine kernel: [ 3190.329557] scsi8 : SCSI emulation for USB Mass Storage devices
Jul 3 10:56:50 mymachine kernel: [ 3190.372427] usb 3-1: USB disconnect, address 4
Jul 3 10:56:51 mymachine kernel: [ 3191.032621] usb 3-1: new full speed USB device using uhci_hcd and address 5
Jul 3 10:56:51 mymachine kernel: [ 3191.162740] usb 3-1: configuration #1 chosen from 1 choice
Jul 3 10:56:51 mymachine kernel: [ 3191.165275] usb-storage: probe of 3-1:1.0 failed with error -5
Jul 3 10:56:51 mymachine kernel: [ 3191.165306] airprime 3-1:1.0: GSM modem (1-port) converter detected
Jul 3 10:56:51 mymachine kernel: [ 3191.165537] usb 3-1: GSM modem (1-port) converter now attached to ttyUSB0
Jul 3 10:56:51 mymachine kernel: [ 3191.171112] usb-storage: probe of 3-1:1.1 failed with error -5
Jul 3 10:56:51 mymachine kernel: [ 3191.171143] airprime 3-1:1.1: GSM modem (1-port) converter detected
Jul 3 10:56:51 mymachine kernel: [ 3191.171330] usb 3-1: GSM modem (1-port) converter now attached to ttyUSB1
Jul 3 10:56:51 mymachine kernel: [ 3191.225441] scsi11 : SCSI emulation for USB Mass Storage devices
Jul 3 10:56:56 mymachine kernel: [ 3194.912815] scsi 11:0:0:0: CD-ROM HUAWEI Mass Storage 2.31 PQ: 0 ANSI: 2
Jul 3 10:56:56 mymachine kernel: [ 3194.944743] sr1: scsi-1 drive
Jul 3 10:56:56 mymachine kernel: [ 3194.944943] sr 11:0:0:0: Attached scsi generic sg2 type 5
Kubuntu Hardy detected it just fine! This should work on any other distros as well. Next comes running wvdialconf as root. It should detect the modem at /dev/ttyUSB0. wvdialconf goes through some init sequences and finally writes the config file at /etc/wvdial.conf. Mine looks like this after a little bit of tweaking:
[Dialer Defaults]
Init1 = ATZ
Init2 = ATQ0 V1 E1 S0=0 &C1 &D2 +FCLASS=0
Modem Type = Analog Modem
Phone = *99***1#
ISDN = 0
Password = password
New PPPD = yes
Username = username
Modem = /dev/ttyUSB0
Baud = 9600
The phone number was found by a little Googling. You can use any Username and Password value as the dialler doesn't check for it. Once you're done, perform a test by executing wvdial. It should work. Here's what I see from my /var/log/messages:
Jul 3 10:58:10 mymachine pppd[21698]: pppd 2.4.4 started by mike, uid 1000
Jul 3 10:58:10 mymachine pppd[21698]: Using interface ppp0
Jul 3 10:58:10 mymachine pppd[21698]: Connect: ppp0 <--> /dev/ttyUSB0
Jul 3 10:58:10 mymachine pppd[21698]: PAP authentication succeeded
Jul 3 10:58:10 mymachine kernel: [ 3231.815307] PPP BSD Compression module registered
Jul 3 10:58:10 mymachine kernel: [ 3231.881861] PPP Deflate Compression module registered
Jul 3 10:58:13 mymachine pppd[21698]: Could not determine remote IP address: defaulting to xxx.xxx.xxx.xx
Jul 3 10:58:13 mymachine pppd[21698]: local IP address xxx.xxx.xxx.xx
Jul 3 10:58:13 mymachine pppd[21698]: remote IP address xxx.xxx.xxx.xx
Jul 3 10:58:13 mymachine pppd[21698]: primary DNS address xxx.xxx.xxx.xx
Jul 3 10:58:13 mymachine pppd[21698]: secondary DNS address xxx.xxx.xxx.xx
Jul 3 10:59:04 mymachine pppd[21698]: Terminating on signal 15
Jul 3 10:59:04 mymachine pppd[21698]: Connect time 0.9 minutes.
Jul 3 10:59:04 mymachine pppd[21698]: Sent 0 bytes, received 0 bytes.
Jul 3 10:59:04 mymachine pppd[21698]: Connection terminated.
Also make sure you're assigned an IP and use ifconfig to see that ppp0 interface is up and running.

Next, I tried to configure a dialup connection via KNetworkManager, but it's broken. A bug report has been filed here. Instead, I fired up KPPP and configured a new modem with the second init string (Init2) with the same values written in /etc/wvdial.conf. The phone number should follow that in the config file as well. Once you're done, fill in the username and password values and away you go :)

Have fun!
Tuesday, July 1, 2008

Installing/Configuring kismet on Ubuntu

Been experimenting with kismet over the weekend and was finally well enough to configure it after some quick digging.

Installation
Do a simple apt-get to install kismet:
apt-get install kismet
That's all there to it. Please note that the version in Ubuntu's repo is 2007-10-R1-2build1. It's a lot older than the one currenly available for download i.e. Kismet-2008-05-R1.

Configuration
If you run kismet right after installation, you'll get the following error:
Launching kismet_server: //usr/bin/kismet_server
Suid priv-dropping disabled. This may not be secure.
No specific sources given to be enabled, all will be enabled.
Non-RFMon VAPs will be destroyed on multi-vap interfaces (ie, madwifi-ng)
Enabling channel hopping.
Enabling channel splitting.
NOTICE: Disabling channel hopping, no enabled sources are able to change channel.
Source 0 (changeme): Opening none source interface none...
FATAL: Please configure at least one packet source. Kismet will not function if no packet sources are defined in kismet.conf or on the command line. Please read the README for more information about configuring Kismet.
Kismet exiting.
Done.
You'll need to configure kismet and attach it to a wifi device. To do this, open up /etc/kismet/kismet.conf and look for the following line:
source=none,none,changeme
I'm using iwl3945 on eth1 on my machine. So here's my config:
source=iwl3945,eth1,eth1
You can look at the list of supported device in kismet's README file here:
/usr/share/doc/kismet/README
It's gzipped, by default (README.gz). So do a quick gunzip before reading. Look for the list under the section named "Capture Sources".

Running It
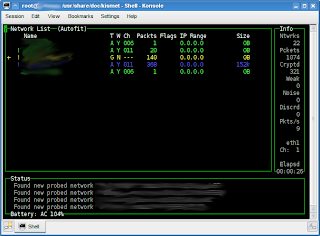
Now run kismet again and you'll get a nice screen like below:


Unfortunately, after exiting kismet, I was greeted with a segmentation fault error and my eth1 link unusable (note the UNSPEC word):
eth1 Link encap:UNSPEC HWaddr 00-1C-BF-A8-F9-C2-00-00-00-00-00-00-00-00-00-00
UP BROADCAST MULTICAST MTU:1500 Metric:1
RX packets:458437 errors:0 dropped:0 overruns:0 frame:0
TX packets:499893 errors:0 dropped:0 overruns:0 carrier:0
collisions:0 txqueuelen:1000
RX bytes:215177287 (205.2 MB) TX bytes:95043280 (90.6 MB)
This is the main show stopper. Time to whip up Google search and the forums :D